Walkthrough

Introduction
Welcome to Jupiter Mission 1999, a science-fiction adventure from Avalon Hill. This walkthrough should help guide you through the complete game. Versions for Atari 8-bit computers and the Commodore 64 were released and are, for the most part, identical outside slightly different graphics and sound. In some cases there are other minor differences and these are noted where it affects the gameplay.
It is highly recommended to save your game when possible; the action sequences can be frustrating and difficult and you don't want to have to start the entire game over after a single mistake! Also note that there is a quirk to saving games (also noted in the manual): if you wish to save your game status in the later portion of the game, you must save the game at least once prior to taking command of the lander! Most likely you'll have done this already, but it is important to keep in mind. Up to four saved games are allowed, after that you'll need to overwrite one of the files to save again. Saving the game can be done at mostly anytime after the asteroids by navigating back up in the menu structure until you have an option "save game". If you're playing in an emulator (likely!), then you can of course also use your emulator's save state functionality.
With all of that out of the way, let's begin!
The Scenario
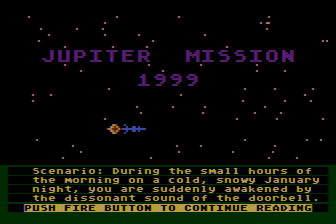
When starting the game, you can either jump straight to the game from the title screen or optionally view the introduction. The introduction explains the scenario in detail and is as follows:
Scenario: During the small hours of the morning on a cold, snowy January night, you are suddenly awakened by the dissonant sound of the doorbell. The house is cold, so you pull on a woolen robe on your way to the front of the house. You wonder who could be at the door at this late hour, but because you are sleepy, no names come to mind. Turning on the hall light, you open the door to find two strangers in long heavy coats and wide rimmed hats. A cold cloud of snow carried by the wind swirls Into the room through the open door. You are about to close the door on the men, when one of them stops you by grasping the door while the other shows you a badge. They are both government agents. Hesitantly you let them into the hall and close the door on the wintery night. They ask to see your ID, and you must return to the bedroom for it. Once satisfied with your identity, they ask that you accompany them, suggesting that you first pack a bag with anything you might need for an extended journey. You protest, but they insist. All they will say in answer to your questions is that your country has need of your services. Argument gets you nowhere. So under duress you pack a few items in a bag and put on your coat to go with them. Still in the dark as to what is going on, you are hurried out of the house and into a waiting car, which carries you off at high speed despite the heavy snowstorm and icy roads. Soon you recognize that you are at the airport. Before you realize it, you are aboard a jet and above the clouds. When you finally land, you are shocked to see that you are at a spaceport! Once off the jet and inside one of the spaceport buildings, you firmly plant your feet and demand to be told what is going on! An older man in a grey suit informs you that you will be boarding a space shuttle in 30 minutes that will transport you to a spacestation, and from there to the Jupiter Mission space vessel. You are going to Jupiter!!! In a daze you are given a physical and a series of injections. Jupiter!!
In what seems like seconds, you are being strapped down in the shuttle. A man is explaining the takeoff procedures to you and hands you a stack of manuals on space flight. Suddenly you are alone. The engines roar to life and the shuttle begins to vibrate violently. You are moving and on your way to Jupiter! .....Takeoff is a rush! To be in space! Within the hour the shuttle docks with a space station where you are instructed to disembark. Without delay you are hurried into the corrugated umbilical connecting the shuttle to the station, where you are soon left in a small room. You are relieved to note that the station has gravity, though it is considerably less than the gravity on earth. Then the sound of a voice interrupts your perusal. The voice originates from the monitor of the computer terminal on the table that has just come to life. 'Greetings.... I trust that you had a pleasant flight to L5 LAUNCH SUBSTATION NO. 3 aboard the USSN shuttlecraft from earth. Please allow me to introduce myself. I am called BEAGLE. I am a Neo-class 4, type SFC10 artificial intellegence. I was built specifically to be the brain of the Jupiter mission vessel - aptly named, SPACE BEAGLE. My microprocessors are integrated with the systems of SPACE BEAGLE. I assure you that I am fully self aware, and I am capable of both conceptual and perceptual thought. I trust that during our voyage, we shall come to know one another as friends as well as shipmates. But at present our Mission Captain, LT. COMDR. Benjamin Rawley, and LT. William Taylor, our navigator and engineer, are holding our launch for your arrival. A shuttlecraft will transport you in 15 minutes. Please proceed to connecting spoke D, and ride the spoke elevator to the station hub. Then proceed to the southend docking facilities. As you approach the station hub, the artificial gravity produced by the spin of the station will gradually disappear. At the hub you will experience zero gravity. When moving in null gravity, it is wise to carefully consider each movement before it is executed. Once we are underway, we will have ample time to answer all of your questions and brief you on the nature and purpose of our mission.' Still in a daze, you follow the directives of the computer.
In a few short hours the SPACE BEAGLE launches. Your next stop is JUPITER. The next six months for you are both tedious and boring. Your crewmates are friendly enough, but always manage to maintain a distance which says 'we are military, and you, but a civilian. But there is always BEAGLE. As the days became weeks, and the weeks stretch into months, most of your time is passed in the pleasant company of the amiable computer. It is from BEAGLE that you learn what little there is to know of the reason for the Jupiter Mission. It seems that in the June of 1997 a high frequency signal was first received on earth that originated from outer space. It was obvious that The signals were being broadcast by an intellegence of some kind for the reoccurring pattern of sounds was both complex and systematized. Unfortunately, the content of the signal remained a mystery. There was much speculation as to its source. From which star was the signal emanating. One can imagine the consternation and astonishment when the location of the source was finally calculated, using a 12th of the the orbit of the earth as a baseline, and found to be within our own solar system.... unbelievably, the fifth planet from our sun, the gas giant, Jupiter!
It was decided that it was imperative that a ship be immediately sent to Jupiter to investigate, and if possible, to attempt contact. The construction of the SPACE BEAGLE was completed in record time, for no one knew how long the signals would continue. The ship was to be manned by a crew of three; two of finest astronauts in the USSN, and a third, someone chose at random. Faced with the unknown, the best computers deemed it necessary to allow for the chance, for the randomizing factor to be considered. Thus you were chosen, a wild card, an attempt to allow for the unknown. It is conceivable that the success of the Jupiter Mission might hinge on how you will react to what will be discovered near Jupiter. At least the government had spared no expense on the construction and outfitting of the SPACE BEAGLE. She is a beauty of a vessel, sleek and well designed, house 31 decks -- all robotically controlled. The power for the ship is a new ion drive that allows a cruising speed of 76,000 km/hr that would make the trip to Jupiter in a single year... but even at that, it is going to be a very long voyage. Also on board are two 2-man landers. Obviously, they were not designed to land on the surface of Jupiter. Neither Man, nor his machines could hope to survive the inhospitable, high gravity maelstrom that raged on the planet. Logically, the signal had to be coming from either an orbiting vehicle or station, or possibly from one of the fourteen moons of the Jupiter system. At any rate that is where the Space Beagle will be looking, using scanners and robot probes. The future of the human race may depend on this first contact. It is a sobering thought. It is not an easy mission.... destined to become more difficult. For late one day, during what the ships clock called afternoon, you were flung to the deck by the shock of three loud explosions that shook the entire ship..........
The Game Sequences
Whether or not you read through the full introduction (which is rather long), it's now time to begin the game! Jupiter Mission 1999 is broken up into a series of mini-games, each with a different gameplay style and goal. To complete the overall game, you'll need to survive or solve each of the individual mini-games. The sequence of games is as follows:
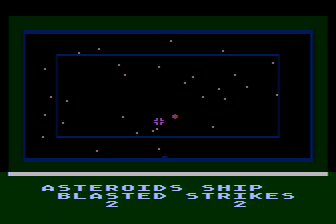
1. Asteroid Field
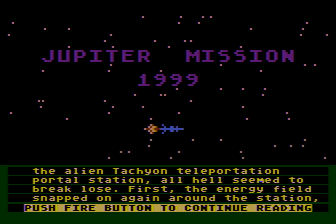
As our story begins, we find ourselves immediately in the midst of an action sequence in an asteroid field! The goal is to shoot as many of the incoming asteroids as possible to prevent further damage to the Space Beagle. Any asteroids that aren't destroyed will hit the ship and cause further damage. If too many asteroids hit the ship (around 30), it will be destroyed completely and the game is over. Only one asteroid appears at a time, and you only get a single chance to destroy each one. Use the joystick to move the cursor indicating the direction you wish to aim, and press the joystick button to fire. In the Atari version, there are some asteroids which remain entirely outside the targeting area and can't be destroyed so some ship damage is inevitable. In the Commodore version this doesn't happen, however it's pretty likely some damage will be sustained anyway as it would be extremely difficult to complete the sequence without at least a few asteroid strikes. As long as the Space Beagle isn't destroyed, you can move on to the next sequence and repair any damage to the Beagle.
2. Ship Repair
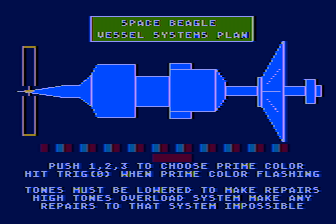
We made it! Once you have survived the asteroids, the ship will likely be heavily damaged and in need of repair before continuing on. The Space Beagle is composed of 62 ship systems with two on each deck. Each system is itself composed of three modules: a red module, blue module, and yellow module. Most of the systems are required in later parts of the game, so you'll want to repair all of the systems that you can before moving on. There are several systems that can not be repaired; these were permanently damaged prior to the player taking control, and are the navigation core memory, computer deck #1 navigation system, the command bridge, and the laser communications. If you do try to repair one of these systems the game will let you know they are unrepairable and you can simply move on to the next system.
To repair the ship, you can follow the following procedure:
- When viewing the diagram of the Space Beagle, move the joystick left or right to select a section of the ship. After the cursor moves an analysis shows the status of the systems in that section with each of the ship sections having two systems. If one or both of the systems are indicated as "OUT", press the joystick button to begin the repair sequence. Note that if both systems are out, you'll need to perform the repair sequence twice for that section, once for each system. If both systems are shown as working (indicated by "A-OK" on the Atari, or "AOK" on the Commodore 64), you can just move on to another section.
- When the repair sequence begins, you'll see two colored bars just below the ship diagram. The top bar is the module status bar and is broken up into multiple blocks of different colors; there are repeating sets of three representing the three modules. The colors of the blocks change one module at a time, so you'll see every third block change in unison. The color below this bar will be red, blue, or yellow which indicates the module you are currently repairing.
- You will also hear sounds along with the color changes; when a color appears in the top bar, a sound corresponding to the level of damage is played. The higher in pitch the sound is, the more damage is present. The lower the pitch, the closer the module is to being repaired.
- When a set of blocks changes color, press the joystick button if the color it changes to matches the reference color shown by the second bar. For example, if the reference bar is yellow and a set of blocks changes to yellow, press the button before colors change again. Note that there may or may not be other yellow (or whichever color) blocks in that top row; that doesn't mean you should press the joystick button then, only if the blocks which have just changed match the color.
- If your timing is correct, you'll hear the pitch of the sounds begin to get lower each time you press the joystick button. If you're wrong, the pitch will increase. Too many wrong joystick button presses and the module will become permanently damaged which in some cases may make the game impossible to complete. If you're successful, the module will be repaired.
- You can choose which color module to repair by pressing 1, 2, 3 on the keyboard; you can also ignore this and just work with whatever color the game presents next.
- When the sequence begins, all three colors will appear in the top bar (plus the background color which you should ignore); after a module is repaired, only two colors will flash in the bar and then finally the one remaining color. When all three colors are repaired the system is complete, and you can move on to the next one.
- To finish this part of the game and move on you'll need to check every section of the ship and repair any of the damaged systems. When repairs are completed, press the "Option" key in the Atari version or the "F7" key in the Commodore 64 version and then select the menu option to enter the next section. While it is possible to indicate you're ready to move on to the next section without completing all repairs, doing so may make the game impossible to win or may even make the ship explode!

3. Navigation
Now that the ship is repaired, we'll need to get the Space Beagle back on course. The asteroid impacts have affected the trajectory, so you'll first need to determine where you are then execute a burn using as little fuel as possible to get back on course to Jupiter. The keys indicated below include both versions of the game in the format Atari/Commodore, so for example 2/F3 means press 2 in the Atari version or F3 in the Commodore 64 version.
- Select option 2/F3 for scanners, then option 2/F3 for Long Range Scan. The game will provide the Space Beagle's status:
Space Beagle is on a course radial to the plane of the ecliptic......presently just beyond the orbit of the asteroid belt minor planets. The Sun is 419483980 km away from Space Beagle and receding by the moment.....at slightly less than our speed of 21.16225427 km/sec. The Earth is 559210776 km away....Because it is on the other side of the Sun, our Long Range Scanner is unable to locate its exact position. Jupiter is 478713280 km from Space Beagle. According to our original course projection, we're 411394225 km from rendezvous with the system.
- The navigation diagram will now show both the Sun and Jupiter in addition to the Space Beagle. The next step is to execute the burn. First, select 3/F7 for Nav. The game will let you know that navigation must be manually controlled.
- We know the Space Beagle is off course, but not by how much or in which direction; to get an estimate for this you can optionally first view the navigation simulation to see the present course. Select option 1/F1 for simulation, then 1/F1 for activation. You'll see the current trajectory along with a message that the Space Beagle will not intercept Jupiter.
- Now that we know our current trajectory, we can go ahead and change it. If you viewed the simulation first, first return to the navigational commands menu by pressing 2/F7. Now select option 3/F5 for course change, then option 1/F1 to set burn.
- Move the joystick left or right to change the burn angle, then press the button to set the selected burn angle. In the Atari version, the angle changes in increments of two degrees and in the Commodore version changes in increments of one degree. In the Atari version, set the burn angle to -46 degrees or for the Commodore version set the angle to -27 degrees.
-
After the angle is set, execute the burn. Select option 3/F5 to activate burn. You'll then be given a choice between the ion accelerator or the
impulse engine. It's not mentioned in the game or manual, but if you open the sealed envelopes included in the game package you'll
find fuel consumption is as follows:
- Ion drive: 4 units/degree of course change
- Impulse engine (over long range): 8 units/degree of course change
- Impulse engine (over short range): 1 unit/degree of course change
- Launching a probe: 10 units
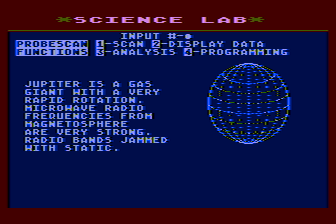
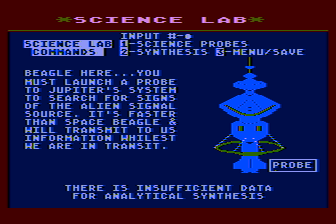
4. Science Lab
We're now on our way to Jupiter again to find the source of the alien radio signals. It will take some time to get there, so while we're waiting we can send out a probe or two (which travel faster than the Space Beagle) to examine the system and find some useful information. So off to the science lab! As above, the keys indicated below include both versions of the game in the format Atari/Commodore, so 2/F3 means press 2 in the Atari version or F3 in the Commodore 64 version.
- Depending on what screen you're on, you need to back all the way out of the navigation menus to the systems command menu. For example, if you had revisited the simulation to confirm you're on course and are still on the simulation screen, press 2/F7 to return to the navigation menu, then 4/F7 to return to the system menu, then select 1/F1. You should now be at the systems command menu, and selecting 1/F1 will bring you to the science lab.
- Now that we're in the science lab, the first step is to launch a probe. Select 1/F1 for science probes, then 1/F1 to launch a probe. You can select probe #1 or #2 by pressing 1/F1 or 2/F3 and a countdown sequence will display as the probe launches. Before moving on in the game we'll need to locate the source of the radio signals by having one of these two science probes visit the various moons of Jupiter and scan for the signals until the source is found. You'll find that the probe detects radio signals very faintly at Ganymede and very strongly at Callisto. Consult the Moons of Jupiter Map to see which moon is which; you don't need to visit all of the moons to continue on in the game, at a minimum only Ganymede and Callisto need to be visited which confirms the signal location.
-
Once the probe is launched, from the launch commands menu select 3/F7 to return to the probe commands menu.
For each moon you wish to scan, you'll need to complete the following procedure:
- Select 2/F3 - Programming.
- Select 3/F5 - Course.
- Use the joystick to move the probe over the moon you wish to scan, then press the joystick button.
- Select 2/F3 - Probecomm.
- Select 1/F1 - Course Change.
After some brief sound effects, you should receive the message "time has passed..... probe has arrived at destination". - Select 3/F7 - Programming.
- Select 1/F1 - Probescan.
- Select 1/F1 - Scan.
- Select 4/F7 - Programming.
- Select 2/F3 - Probecomm.
- Select 2/F5 - Probescan.
- Select 4/F7 - Programming.
- Select 1/F1 - Probescan.
- Select 2/F3 - Display Data.
The moon statistics screen should display. In some cases, the data may not fit on one screen so you can press the space bar when prompted to continue. - Select 3/F5 - Analysis. This will indicate whether or not radio signals are detected as well as the detection of an artificial orbiting device around Ganymede.
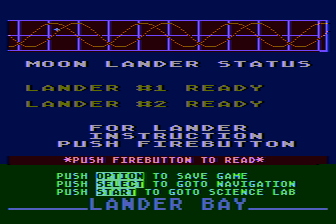
5. Lander Bay Command
Once Ganymede and Callisto have been scanned, we have now confirmed that Ganymede is the source of weak radio signals and also has a device orbiting it which is generating a dangerous energy field. Callisto has been identified has having strong radio signals coming from it and the analysis indicates we could learn more by finding a transmitter on the moons surface. Given this knowledge, we now have a reason to land on Callisto so it's time to send a lander there in order to explore further! To send out a lander, we first need to position Space Beagle in orbit around the moon Callisto. Similar to the previous sequence of getting the Space Beagle back on course, we'll need to use the scanners to find the moon and execute a burn to adjust the ship's course.
- Return to the navigation menu; select option 2/F3 for scanners, then option 1/F1 for Short Range Scan.
- The game will ask which moon you are interested in getting on short range scan; every moon you have sent a probe to and completed the probe scan for will be available for selection (if you haven't sent the probe yet, you can't navigate there). You will be asked to answer yes ("Y") or no ("N") for each moon, so keep selecting no until you reach Callisto then select yes.
- Select 3/F7 - Nav to return to the navigation menu.
- Select 1/F1 - Simulation then 1/F1 - Activation to see the current course simulation.
We're still on our previous trajectory and will crash into Jupiter if we don't do something! - Select 2/F7 - Navigation.
- Select 3/F5 - Course change.
- Select 1/F1 - Set burn.
- Again, use the joystick to set the burn angle.
For the Atari version set an angle of -40 degrees, and in the Commodore version set it to -21 degrees. - Select 3/F5 - Activate burn.
- Select 2/F5 - Fire impulse engine.
Since we are in short range this time, we'll use the impulse engine to conserve fuel. We'll need to perform one more burn later in the game, and if you use too much fuel you won't be able to perform the final burn and complete the game! In the Atari version if the burn angle is correct the simulation will auto-activate this time and you will receive the message that you are on course to Callisto. In the Commodore version, you will need to go back up in the menu and manually select the simulation. You should then find that you are on course to Callisto.
Now that the Space Beagle is in position, it's time to head to the lander bay.
- Select 3/F7 - Nav.
- Select 4/F7 - Menu/Save (or Sys/Save).
- Select 1/F1 - Menu (or Systems).
- Select 2/F3 - Lander Bay (or Landers).
The landers should be ready now! If you are at the wrong moon, you'll instead receive the message "Beagle here.....there is no reason to send a lander out from the ship to this moon......". You will also receive this message at Callisto if you haven't yet completed the scanning and analysis steps to verify it as the source of the radio signals.
6. Lander Control
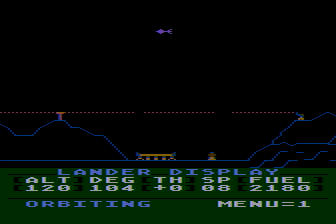
Another action sequence is up next; the Lander Control portion of the game will be somewhat familiar if you've ever played any Lunar Lander style games. You can use the joystick to change the lander's orientation, and then press the joystick button to fire thrusters. If the lander comes into contact with anything, such as mountains and buildings, it will crash. To land safely, you need to have the lander oriented vertically over the landing pad and land at a safe speed.
You begin the sequence at approximately 345 degrees; you'll find the landing pad at approximately 104 degrees. The landing pad is protected by an energy field (shown as a dashed line); if the lander touches the energy field, it will be destroyed. Slightly to the right and left of the pad are two gaps where you can navigate through safely. There are several other gaps in the energy field, however they are not useful as mountains and other obstacles would prevent you from reaching the landing pad; only the two gaps that are near the pad are helpful.
Each lander has a limited amount of fuel that is used up any time the thrusters are firing. If fuel runs out, the lander crashes. After completing the moon base sequence next, you'll need fuel to take off again but don't worry if you have very low fuel levels after landing — more can be found in the maze.
If you miss the landing pad, the screen wraps around so it may take less fuel to go around the moon again instead of trying to reverse direction. In the Commodore 64 version, the screen doesn't scroll back to the right like in the Atari version so this is the only option there. There is no time limit, only a limit on fuel, so you aren't penalized for taking time to view the entire moon first before attempting your landing.

7. Alien Moon Base
After a successful landing, you'll enter the alien moon base. This section of the game is a maze; consult the Alien Complex Map to see the complete maze. Players begin in the top left, and need to reach the control device in the bottom left. This device will disable the energy field that is surrounding Ganymede allowing a probe to land there.
The maze contains many obstacles, disabled lifts, and locked doors you'll need to get past. Some doors and lifts can be activated by scanning a nearby computer (one of the vertical columns in what look almost like buildings), while others will require that you find a key. When scanning computers, note that each column is scannable individually; you may find that in a large computer bank with multiple columns only one of the columns does anything useful.
In addition to the lifts and doors, there are several piles of rubble. These can't be passed initially, but there is a ray gun in the maze you can then use to destroy rubble. To reach the end, it will be required to collect all available keys as well as the ray gun.
There are two additional items that can be collected; towards the middle right side of the maze are a number of canisters. Most of them are empty, however one contains additional fuel; this is needed to take off later, so be sure to scan all canisters until you find it! Additionally, extra food can be found in one of the supply rooms (the rooms with the variable blue columns, the food is in the smaller one towards the left center). Be sure to grab this as well.
At one point, you will find a computer room with a number of tapes in it (this is located in the bottom left, just above the control device). Starting from the bottom you can take any of the tapes that aren't damaged and use them in the computer at the top of the room; this will reveal the story of our alien invaders!
After the control device has been activated and the energy field disabled, a security measure kicks in and all of the lights in the maze are turned off! We now need to get back to the starting location, however none of the maze walls, doors, or anything else will be visible. The remote probe sensors still work, however, so at the bottom of the screen you see the brief descriptions to help determine where you are. You'll see messages such as "sensors indicate that the robot probe is inside a narrow passageway" or "there is a door here but it is not locked". Each message provides a clue as to where you are, if you combine this with the map linked to above you should be able to find a path back to the maze entrance at the top left.
Once you exit the maze, you'll be back in the lander and will need to take off. Luckily, unlike when landing, you don't need to manually pilot the lander. You'll see a view similar to the landing sequence with the message "ready for takeoff" displayed at the bottom of the screen. Press the joystick button, and the lander will be in orbit around the moon; then press 1/F1 for the system menu. Select option 0 for lander command. You'll see the lander command screen again with a message informing you that the lander mission was successful:
Our lander mission was successful but our main reason in coming to Jupiter is not completed. The Earth may be in great danger. It is up to us to investigate the Jupiter system before we act...
What we learned within the alien base will decide what we must now do.........
After reading the message, we can now return to either the navigation screen or science lab.
8. Alien Station
It is now time to investigate Ganymede! The energy field is down, so we can safely send some robot probes to explore. We're still in orbit around Callisto, so it's time to execute another burn to position the Space Beagle around Ganymede. We'll be repeating the process we used before to navigate to our destination.
- Select 3/F7 - Nav to return to the navigation menu.
- select option 2/F3 for scanners, then option 1/F1 for Short Range Scan.
- This time around, when asked which moon you want the scan for, respond no until Ganymede comes up then respond with yes. You should then have Ganymede and Jupiter on the display.
- Press Select/F3 to go to back to Navigation.
- Select 3/F5 - Course change.
- Select 1/F1 - Set burn.
- Once again, use the joystick to set the burn angle.
For the Atari version set an angle of -42 degrees, and in the Commodore version set it to -18 degrees. - Select 3/F5 - Activate burn.
- Select 2/F5 - Fire impulse engine.
Once again we'll want to use the impulse engine to conserve fuel as we barely have enough for this burn. If you used too much fuel earlier in the game, you won't have enough for this burn and there is nothing further you can do except go all the way back and try again.
Once again in the Atari version if the burn angle is correct the simulation will auto-activate this time and you will receive the message that you are on course to Ganymede. In the Commodore version, you will need to go back up in the menu and manually select the simulation. You should then find that you are on course to Ganymede.
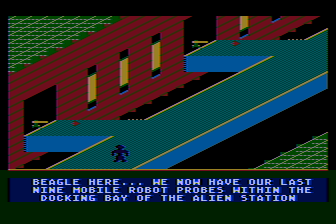
Now that we're in position, it's once again time to send out a lander. Like before, navigate to the lander bay menu. The game should inform you that we are in orbit around Ganymede and the energy field is down. A robot probe will automatically be sent down (there is no lander action sequence), so you can just read the update then press the joystick button to continue and enter the station.
After we've landed the probe at the the alien station there is another action sequence. Nine mobile robot probes are placed within the alien station docking bay. The goal is to successfully navigate one of the robots to the master control room at the end of a catwalk. Along the catwalk are a series of guns that fire continuously; to reach the end, guide the probe past the gunfire while also not falling off of the left or right side of the catwalk. You are given three attempts at this section; if you lose all nine robots, you move on to the next attempt starting back at the beginning with nine new robots. The game is over if you fail to reach the end within the three attempts.
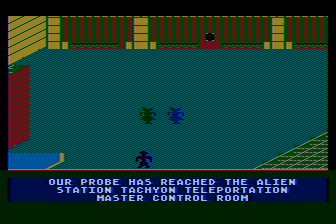
9. Master Control Room
We have now reached the final task necessary in order to win the game! The goal here is to engage the self destruct mechanism. You'll find the self destruct control panel at the top middle of the screen along with two aliens who try to prevent you from reaching it. The aliens won't move across the entire screen and instead remain roughly in the top 3/4 of the screen. If one of the aliens catches you, the robot is bounced back to the starting location at the bottom of the screen.
To engage the self destruct, navigate in front of the control panel and push the joystick up; it will take the robot 254 moments to interpret the panel and engage the mechanism, so you'll need to stay there for a while. The two aliens will inevitably catch you while the robot is standing still at the panel, but luckily during this sequence they don't destroy the robot and there is no time limit. The amount of time remaining also doesn't reset when the robot is caught, so you can just keep repeating the process of avoiding the aliens and reaching the control panel until the game reports there are 0 moments left. When the count finally reaches 0, you will have won the game and the ending story displays.
Ending
Congratulations, you have completed Jupiter Mission 1999! The game's story now concludes, and sets up the premise for the sequel.
..... When Beagle, working through the mobile robot probe, managed to activate the self-destruct switch of the alien Tachyon teleportation portal station, all hell seemed to break lose. First, the energy field snapped on again around the station, this time with the SPACE BEAGLE within the protected perimeter. The sensors aboard the SPACE BEAGLE noted an almost impossible increase in the energy levels being generated within the station. Contact with the mobile robot probe was lost as all monitoring systems were overloaded. What happened next must be assumed from the resulting facts. Moments before the energy level within the station reached a critical level, a beam emmitted from the station, encompassing the SPACE BEAGLE in its rays. Instantly the structure of reality aboard the SPACE BEAGLE ruptured into chaotic fragments. The very atoms that comprised the substance of matter seemed to be repelled from each other, creating visibly widening gaps, until any semblance to normal perceptual reality was impossible. Time was stretched, moving ever more slowly, until finally it ceased to move. For a single static eternity the universe hung suspended in a state of formless nonexistence.........
...... And then the universe once more existed, once again was real. Imperceptably at first, there was change. Somewhere within the whole, a potential was building-- like a moment before a storm breaks, unseen yet real. Your awareness of its growth swelled until it was more than you could bear. And still it increased. But just when you were at your very limits of endurance, the diseminated atoms began to move together again, to recombine and reform, to become whole; moving tangentially, spinning, faster and faster, creating a vortex that spun at impossible speeds! Overcome with vertigo, your last conscious thought was of tumbling headlong into the coalesing epicenter of the vortex. The next thing of which you were aware was a persistant pounding in your head that kept cadence with an irritating high-pitched sound. As consciousness returned, the sound resolved into the anxious voice of Beagle who was trying to rouse you by generating cacophonous tonality.
Beagle here.... Are you all right? I was worried that the transfer had overloaded your mental circuits and caused irrepairable brain damage. I must say that even I suffered an interminable lapse at some point, however, all my internal systems responded instantly once restored. It now appears taht the temporary malfunction we both experienced was the result of experiencing Tachyon transfer. Apparently the alien station was programmed to transfer any vehicles within it's energy field before it self-destructed---probably to protect any Beings in the vicinity from being destroyed in the blast. The last thing our sensors picked up was the lead wave of the explosion of the power unit of the station; approximately a one gigaton blast. From the earth the display should be quite impressive. At least we can congratulat each other for accomplishing our mission and saving the earth. Unfortunately it may not be possible for us to save ourselves. Sensors are unable to identify any constellations that presently surround us. The only fact I have been thus far able to ascertain is that we are definitely no longer within our own galaxy. I fear we are quite lost. To make matters worse, we are presently surrounded by a vast fleet of alien vessels, as well as another Tachyon station. I have concluded that the alien fleet was momentarily ready to migrate to our solar system when we destroyed the Tachyon Portal at the other end. The occupants of the massed vessels are obviously somewhat upset. They have been attempting contact for some minutes now; and unfortunately there is a ship fast approaching us. I do hope that you can come up with a plan....
LOOK FOR THE NEXT INSTALLMENT OF
JUPITER MISSION 1999 FROM
MICROCOMPUTER GAMES, INC.
THE ADVENTURES OF THE SPACE BEAGLE.
Notes and Errata
- In the science lab there is a menu option for "Synthesis". As of this writing, I'm not sure what this is for and I haven't been able to get anything
other than the message "there is insufficient data for analytical synthesis". Whatever it does, it's apparently not needed to complete the game.
Edit: I found that the synthesis menu choice can be used when you have the Space Beagle in orbit around a moon of Jupiter. It's especially usefull when orbitting Calisto or Ganymede; the information provided gives you more details about the alien bases and indicates what your next steps should be. Viewing this is not necessary to complete the game, but it provides some more context of what you have found near Jupiter. - In the Atari version there may be either a bug or an emulation error when swapping disks; I encountered a solid blue screen with the game seemingly frozen. What seems to be actually going on is the game needs a different disk, but the message requesting the disk isn't displayed. If this happens you can insert a different disk then press enter; since there are four disks, you may need to try a few times but eventually should get it right! Once the right disk is inserted the game should continue.
- In this initial version of the walkthrough, some information isn't yet as complete as I would have liked. Hopefully in a later version I'll get around to filling in some gaps such as notating in the map where keys are located, and add aditional tips and tricks. For now, though, this should at least help get you going!
| Version: | 1.1 |
|---|---|
| Last Updated: | December 21, 2025 |