Tips and Tricks
Introduction
Welcome to Quest of the Space Beagle!
Previously, I took a look at Jupiter Mission 1999, and you can find the walkthrough here. Quest of the Space Beagle is the sequel, and like it's predecessor consists of series of mini-games presented in an order that sort-of tell a story. This time around there are only 3 sections to the game compared with 11 (or 9, depending on how you count — some sections are more or less repeats) in the first game. Like in the first game, it's possible to save your progress and I recommend doing so often, especially for the maze sequence.
It's not really possible to provide a step-by-step walkthrough to guide you through the entire game this time around since the first sequence is an action game and the final sequence has a random element to it. Instead, this guide contains a few tips that will hopefully help you survive each of the 3 sequences and make it back to Earth.
The Story So Far
First, the game starts off getting you up to speed in case you haven't played Jupiter Mission 1999. Viewing the intro is optional, but if you choose to the scenario is as follows:
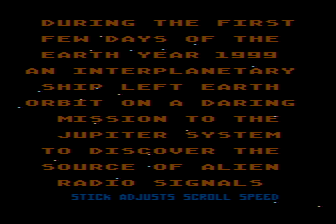
During the first few days of the Earth year 1999 an interplanetary ship left Earth orbit on a daring mission to the Jupiter system to discover the source of alien radio signals suddenly received on our planet.
The Space Beagle was the name of the ship, which was controlled by Beagle, an aware, sentient computer who was in effect the brain of the Space Beagle.
As fate would have it, while passing through the asteroid belt the ship was almost destroyed by collisions with the asteroids.
You were the only crew member to manage to survive
With the help of the damaged Beagle you were able to complete Jupiter Mission and save the solar system from an impending alien invasion by setting the self destruct switch of the alien tachyon teleport station.
But an instant before the station exploded, a beam engulfed the Space Beagle and trasported you to a far galaxy.
Here you were confronted with the massed fleet that would have teleported to our solar system.
As an alien ship fast approached the Space Beagle you assumed you were about to breathe your last.
You were surprised to find the aliens to be very amiable. You were escorted to their central planet and shown every courtesy.
In the following weeks, aided by a translator device, you learned of the plight of the humanoid faunians.
They were the lineal descendants of the race that constructed the tachyon portal, many eons past in the Jupiter system, to be used to transport their population should their star system ever be menaced.
Such a threat had finally appeared.
From a neighboring there came a warrior race of sentient quadruped beings whose sole purpose was to conquer the universe for the glory and purse of their emperor.
In their wake they left a ravaged string of worlds.
The faunians had learned of the approach of the Gentuza from the refugees that fled before their wave of hyperdriven starships that travelled faster than lightspeed.
Their hyperdrive was the primary advantage held by the Gentuza over the races they conquered who could travel only as fast as lightspeed.
The faunians had the tachyon beam, but it required a receiving station for a safe and certain transport.
Your new friends, the Faunians, had evolved from gentle herbivores, and were unable by nature to fight.
Their only hope of survival had been the Jupiter portal which you in your ignorance had destroyed.
To make matters worse, with the Jupiter station destroyed, there was no way for the Space Beagle to return to Earth.
You were stuck, so you decided to help the Faunians to fight against the Gentuza.
Besides, if you could defeat the Gentuza, you could get a hyperdrive for Space Beagle.
The plan of attack was simple. You would attack the home world of the Gentuza with a fleet of robot controlled ships.
Ingalactic tachyon transfer was risky but the only hope.
The Faunian's were almost certain that a transfer could be made to the home system of the Gentuza. There was just a chance that you could capture the Gentuzian home world with the surprise attack.
The robot fighters were amazingly mobile machines, but they would have to defeat the entire Gentuzian reserve fleet.
Space Beagle was equipped with new inboard systems by the Faunians.
The stage is set. Your destiny awaits you...
The Game Sequences
Once the introduction is out of the way (or you skip it altogether), the game begins! Here are the three game sequences you'll encounter.

1. Space Battle
The first sequence is an action mini-game. Following the final events of Jupiter Mission 1999, we are near the home planet of the Gentuza facing an entire enemy fleet. Players control a fleet of 10 robot fighters and need to destroy the enemy fleet consisting of 40 fighters. Robot fighters are launched one at a time and players need to destroy as many enemy fighters as possible before being destroyed. Once all 40 enemy fighters are destroyed, the game continues on to the next section. Since this an action sequence, step-by-step instructions to complete the battle aren't possible, but here are a few tips that may help you out.
- There will always be two enemy fighters at a time; if one is destroyed, a new one takes it's place. The only exception is the final fighter after the other 39 are destroyed.
- You may be tempted to be constantly moving, either to avoid enemy fire or to chase the enemy down. It turns out, however, this isn't the best strategy for this game. The enemy is fast; following them is difficult as your robot fighters don't keep up, and the slow firing speed of the canons makes hitting an enemy difficult if you do get them in the target area. Instead, try to avoid moving as much as possible. Surprisingly, the enemy will not hit your fighter as much for some reason. This isn't foolproof and you'll take some damage; occasionally you may need to move to adjust your position or dodge an occasional shot, but overall you'll take less damage remaining still.
- Once you stop moving constantly, you'll notice that the enemy fighters fall into a pattern. They more or less fly in a loop, disappearing off screen into the distance then coming back in to fire a shot or two before repeating. Look for and take advantage of this pattern; wait for the enemy to fly into the targeting area on their own and be ready to fire. In many cases you may find the enemy remains just slightly outside the targeting area when flying by (this seems to happen more in the Commodore 64 version). If this is happening often, you can nudge your position shortly before the enemy is about to fly by to ensure they can be shot. You shouldn't have to adjust too much, just enough to target the fighter.
- When an enemy is destroyed, a new one appears; initially, the position and movement will be random so remain still to give it a moment to fall into the loop pattern. Be ready to fire in case it does pass through the targetting area. There is no variety in the enemy fleet, all of the fighters are the same and will eventually follow the same patterns.
- Note that in the Commodore 64 version, you can't fire while there is an alarm (screen flashing) after being hit. In the Atari version, you can still fire during this time making that version slightly easier.
- When the final enemy is destroyed, it may seem like there's nothing to do; you'll just be flying through space. What's required here is to get on track to the alien home planet. To do this, you need to adjust your position so the Mark indicator on the right side of the screen reads "000 000". If you don't see the status display (it's not always shown during flight), press the F5 key in the Commodore 64 version or the Select key in the Atari version.
Beagle here..... We have defeated the Gentuzian fleet and captured their planet! For a situational update push the firebutton.
According to the sacred code of the Gentuzian Empire, the strongest was always chosen as the leader of the race and the planetary systems conquered by the fearsome Gentuza. Naturally, they now look upon you as the strongest, being he who has conquered the fearsome conquerors.
All you care about is obtaining a Gentuzian hyperdrive for the Space Beagle, and then to begin searching for the Milky Way and the Earth.
But the gentuza refuse to give you the drive until you prove yourself worthy in the rite of survival in the Labyrinths of Kamerra. If you survive you will win the hyperdrive as well as the crown of the empire. If you should fail, then nothing will matter. The rite will begin...

2. Labyrinths of Kamerra
Once the enemy fleet is destroyed, you'll find yourself in the deadly Labyrinths of Kamerra. This is a maze sequence; consult the Labyrinths of Kamerra Map if you wish to see the complete maze. The graphics shown in the map are from the Atari version, however the Commodore 64 version is identical but with slightly different colors. You'll begin the maze in the bottom left with the goal of reaching the exit at the bottom right. Here's a few additional hints to help out:
- Time is limited; you'll see at the bottom of the screen your stamina and oxygen supplies. The stamina level doesn't decrease constantly, instead it is reduced by one point each time you collide with something (the walls and the maze's dangerous inhabitants). In contrast, the oxygen level depletes at a constant rate even if you're doing nothing more than standing still. Each can be restored by finding either a food ration or an oxygen container in the maze. There aren't many of either of these; if either your stamina or oxygen are close to the maximum, it may be a good idea to leave a ration or oxygen container alone and pick it up later. You'll need to go back and forth across the maze a few times so leave these bonus items for when you really need them.
- In the Atari version, beware of walls! Bumping into walls will reduce stamina. Surprisingly, so will bumping into food rations or oxygen tanks; to pick up these items, don't walk into them but instead stand right next to them until you hear the sound and the game indicates they have been acquired. In the Commodore 64 version you won't lose stamina for touching a wall and can pick up items by simply walking into them.
-
You'll find two opponents to avoid throughout the maze:
- Ardillian Whipstingers:
These dangerous creatures don't move, but you'll find many located throughout the maze. If you get too close, stamina is reduced so try your best to avoid walking near them. If you are stung, you'll hear a sound a see a message indicating this. - Quordish Sycophants:
These creatures wander the maze somewhat randomly, but tend to follow the player around. They appear as a sparkly cloud and can even move through the walls. If you find one is blocking your path, it can often be a good idea to pause for a minute until it moves on. If you touch one, stamina is lost and because they move faster than the player once caught escaping is difficult without losing extensive stamina.
- Ardillian Whipstingers:
- There are four pits in the maze you will need to cross; initially, only one of them has a bridge across it. To cross the remaining three pits you need to activate the bridge. To do so, you'll find three computers in the maze, each one activating one of the remaining bridges. On the map referenced above, you'll find these labeled; the first computer, C1, activates the bridge B1, C2 activates B2, and C3 activates B3. To activate one of the computers, stand next to it until you hear a sound and the game informs you that some switches and relays have been moved. Be careful, after activating a bridge it is possible to deactivate it via the same computer!
- Ordinarily, the screen begins scrolling when your character nears the edge. This can make the Atari version difficult since you don't get as much warning when a wall is about to appear from just offscreen. In this version you can press the joystick button to continue walking and have the screen scroll even if you aren't near the edge. Take advantage of this feature to avoid being surprised by walls suddendly coming into view. This feature is not available in the Commodore 64 version.
Once you escape the labyrinths, the game's story continues:
You have survived the labyrinths! The gentuzu accept you as emperor. Your first command as emperor is to declare peace in the gentuzian realm. From this day forward all races of the realm will work together. A Gentuzian hyperdrive will be installed in the Space Beagle. The faunians arrive and help the Gentuzians with the installation. Very soon you will begin searching the universe for the planet earth! Then finally the work is completed, the whole universe lies before you! But you may search forever and never find the tiny speck that is earth. You vow that as long as you live you will search for the planet earth.
3. Space Exploration
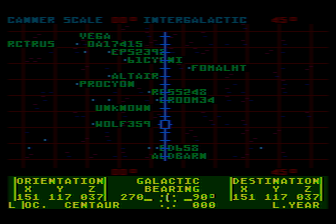
Now that you've escaped the Labyrinths of Kamerra and have a shiny, new hyperdrive in the Space Beagle, it's time to explore the universe! The problem is, where to go? The goal of this final section of the game is to locate Earth. This part of the game begins at the super galactic scale showing numerous clusters of galaxies. Your task is to first locate the local cluster where the Milky Way galaxy is found, then locate the Milky Way galaxy itself, and finally find our Sun.
When you begin this sequence, you'll start in the same location (NGC3396) viewing the scanner at the super galactic level; from this starting view the local cluster is located at approximately 28°. Consult the super galactic map if you wish to see this visually (note that at the moment this is a partial map, but it does indicate the local cluster). When you have finally found the local cluster, you'll receive the following message:
WE HAVE LOCATED THE LOCAL CLUSTER
OUR MILKY WAY GALAXY IS WITHIN
FIREBUTTON REDUCES SCANNING | SCALE
MOVE STICK TO MAINTAIN PRESENT SCALE
WE HAVE LOCATED OUR MILKY WAY GALAXY
SOMEWHERE WITHIN IS OUR SUN
FIREBUTTON REDUCES SCANNING | SCALE
MOVE STICK TO MAINTAIN PRESENT SCALE
Unfortunately, you're on your own after here! Once you travel to the local cluster you won't be in the same location each time, you'll be somewhere in space. Due to this the view of the galaxies also isn't the same; as of this writing I'm not sure how many possible locations you could end up in or if there's a way to determine which locations you should visit other than guessing. If I ever find a way to reliably find a path to the end I'll add it here.
To navigate the galaxies, use the joystick to move the cursor around; when it's positioned over a galaxy or star, press the button to see information about it including the distance from your present location. If you have visited that location before, a name is shown otherwise you'll see "unknown" displayed on the map. If the cursor is at the location you want to travel to, select it by pressing "Select" in the Atari version or "F5" in the Commodore 64 version. The map will re-center, and then you can press "Start" in the Atari version or "F7" in the Commodore 64 version to begin the hyperspace sequence.
There is, unfortunately, also no shortcut or hints that can be provided for the hyperspace balancing sequences. Each time you travel to a new location, you'll need to complete 2 or more games of "follow the leader". You'll see a series of green circles flash on the screen in a grid; when the sequence is done, move the cursor to each block in the grid in the same order as was shown by the flashing circles and press the joystick button. Each time you are correct, the "warp" value shown to the top right will increase; you need this value to reach 1.00 and remain there. The number of items you need to repeat can vary; depending on what scale you are currently at, the distance to the destination can vary the number of items there are in the sequence! Also note that if you get one of the locations in the sequence wrong, you can simply move on to the next one in sequence (you don't get a second guess at the one that was wrong). So for example, if the sequence is top left then top right and you select the wrong square for top left, you should then select top right for your next move and continue on from there.
If you have the patience to complete this sequence, congratulations! You have returned to Earth and won Quest of the Space Beagle!

About the Graphics
You may notice that most screens in Quest of the Space Beagle are rather flickery (the Labyrinths of Kamerra and some text only screens are an exception); this applies to both the Atari and Commodore 64 versions. The flicker may be especially noticable in emulators; depending on the emulator you are using or the computer you're running on, any lag in the frame rate can make the flicker even more noticable. This flickering is not an emulation bug and is an intentional effect by the developers; it is essentially a form of temporal dithering and used as a way to give the illusion of more colors than the computer could actually display. It also provided a translucency effect with some objects appearing to overlay others (such as in the first sequence the heads up display seeming to overlay stars and the enemy fighters). You would see this flicker on real hardware too; common t.v.'s and monitors at the time of the game's released used phosphors that had the brightness decay at a slightly slower rate than modern displays which helped hide the effect slightly, although it wasn't perfect and the flicker was still noticable. To try to hide this effect further, the colors used in the Atari version are quite dark (another intentional design decision). The screenshots found on PixelatedArcade blend two frames together on screens that use this effect to provide a better representation of how the game would actually look. Without doing so, only half of the graphics would be seen at a time making the image appear incomplete.
| Version: | 1.0 |
|---|---|
| Last Updated: | December 21, 2025 |